Global Point of Care

Afinion 2 Analyzer Web Server Tutorial

Afinion 2 Analyzer Web Server Tutorial
1. Introduction
The purpose of this document is to provide instructions on how to use the Afinion 2 Web Server feature. This optional feature is included in Afinion Software release 21.13 and above. Users can use this feature to perform the following activities:
- Configure or change the Afinion 2 Network Settings from a computer
- Upgrade the Afinion 2 analyzer software from a computer, as an alternative to existing way using USB thumb drive
2. Requirements
This section describes the prerequisite for the Afinion 2 Web Server.
2.1 Equipment
- Computer with connection to Afinion 2 analyzer via Ethernet port1
- Ethernet cable
2.2 Afinion 2 Analyzer
- Instrument software version must be 21.13 or higher
2.3 Operator Credentials
- Operator must have the user ID and password required to access the Afinion 2 Web Server
- Default username: admin
- Default password: Userpw1&
3. Computer network and Afinion 2 configurations
Activities described in this section must be performed prior to using the Afinion 2 Web Server.
3.1 Connect Afinion 2 Analyzer
- Ensure the analyzer is powered off
- Connect the analyzer to the computer via Ethernet port using Ethernet cable
3.2 Configure Afinion 2 Analyzer Network Settings
- Power on the analyzer and wait until Start-up menu screen is displayed
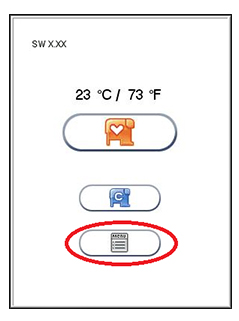
2. Touch  icon from the Start-up menu to enter Main menu
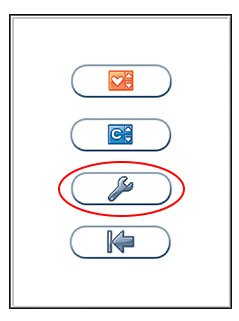
3. Touch  icon from the Main menu to enter Configuration menu

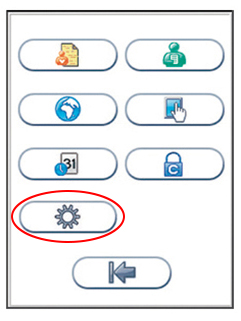
4. Touch  icon from the Configuration menu to enter General setting menu

5. Touch  icon from the General settings menu to enter Network setting screen

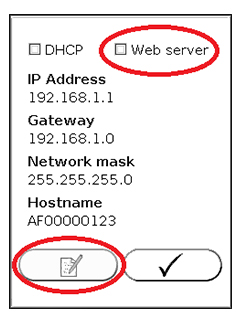
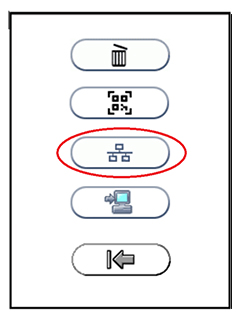
6. Touch 'web server' and then  from the Network settings screen to start Web Server network configuration
7. Enter 192.168.1.5 for the IP Address2
8. Touch  to confirm and continue to Network Mask
9. Enter 255.255.255.0 for the Network Mask
10. Touch to confirm and continue to Gateway
11. Enter 0.0.0.0 for the Gateway
12. Touch to confirm and continue to Host Name
13. Enter preferred Host Name

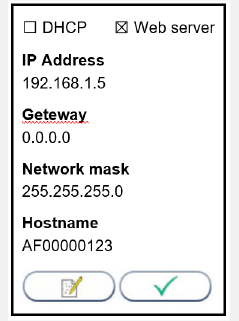
14. Touch to confirm and return to analyzer network setting view
15. Touch  to confirm and return to analyzer network setting view
3.3 Configure Computer Network Settings to a static IP address


1. Open View network connections from the start menu
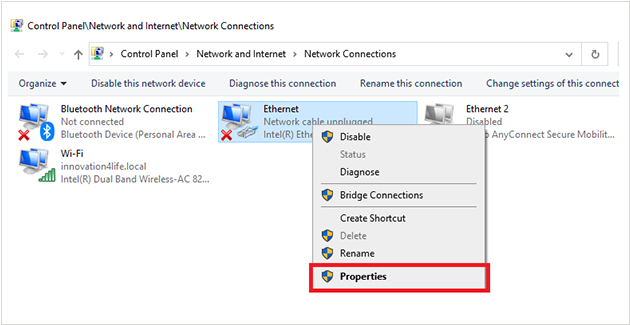

2. Right-click and select Properties on the connection that is connected to the Afinion 2 Analyzer.
Note: Administrator privileges are required to change the network settings.

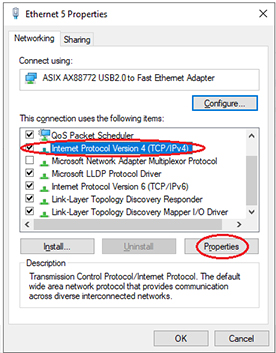
3. Select “Internet Protocol Version 4 (TCP/IPv4)” and then click Properties from the Ethernet Properties dialog window.

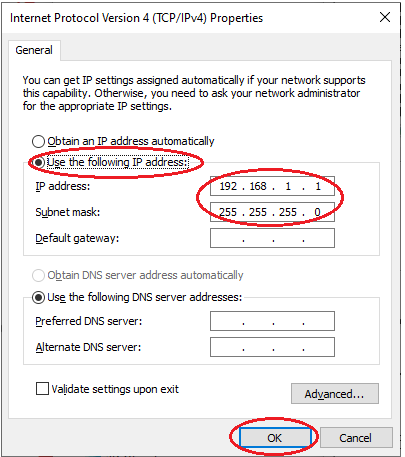
4. From the Internet Protocol Version 4 (TCP/IPv4) Properties dialog box, select “Use the following IP address:” radio button, set IP address and Subnet mask to the following, and click OK:
- IP address: 192.168.1.13
- Subnet mask: 255.255.255.0
5. Click OK from the Ethernet Properties dialog box to exit.
4. Upgrade software using the web server
4.1 Connect and Login to web server


1. From the computer, open a web browser and type in the IP address of Afinion (see step 7 in section 3.2) on the address bar and press Enter


2. Enter a valid username and password when prompted to access the site (see section 2.3).

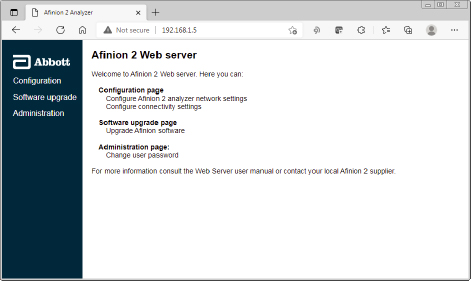
3. Main page is displayed upon login.
4.2 Configure Afinion 2 Analyzer Network Settings
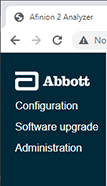

1. Select Configuration from the Web Server Main page


2. Update any desired fields from the Configuration page and click Update settings to save the changes to Afinion 2 Analyzer.
3. If desired, click Reset settings to default to reset network and connectivity settings back to default.
4.3 Upgrade Afinion 2 Analyzer Software
- Download the software upgrade file4 from globalpointofcare.abbott to your computer
- Place the software upgrade file in a location of your choice on the computer
- Connect the computer to the Afinion 2 Analyzer via LAN

4. Select Software upgrade from the Main page

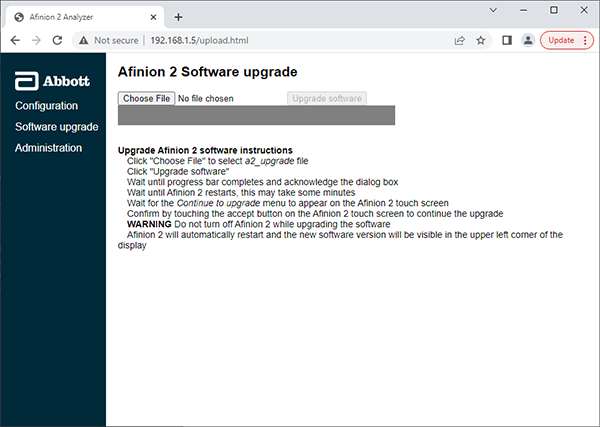
5. Click Choose File from the Software upgrade page to select the software upgrade file
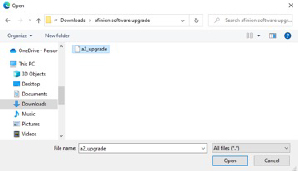


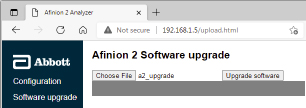
6. From the file browser, navigate to the location of the software upgrade file, select the file, and click Open. Selected file name is displayed next to the Choose File.
Note: The upgraded software version must be equal to or higher than the existing instrument software version.
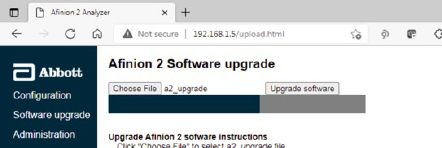

7. Click on the Upgrade software to upload and apply the software upgrade file. Upon completion of the software upgrade process, Afinion 2 analyzer is rebooted automatically.
Note: Progress bar indicates the software upload progress.

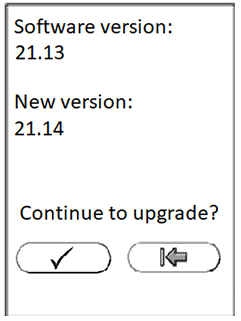
8. From the Afinion 2 Analyzer screen, confirm the software upgrade by touching the

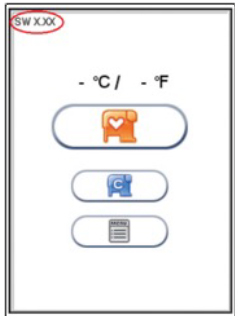
9. Afinion 2 Analyzer Start-up menu is displayed upon completion of software upgrade and self-test. Verify that the upgraded software version is displayed on the Start-up menu
Notes
- There is no defined limit on the number of computers Afinion can communicate with. In a LAN, Afinion can support 1 to many connections and many to 1 connection, as long as the Afinions have different IP addresses.
- In this example, we use the default IP address. It can be any valid IP address in the same subnet as the connected computer/LAN.
- In this example we use the first available IP address in the same subnet as the default IP address of Afinion. It can be any valid IP address, as long as the computer and the Afinion are in the same subnet.
- The software upgrade fails if it's an older version than the currently installed software.